Tuesday, June 9, 2015

Electroforming or Plating with Gold, Silver, and Other Metals


Electroforming or Plating with Gold, Silver or Other Metals
We get two questions more frequently than any others about electroforming and plating. This post is to answer both of these questions and to offer some new information about plating with various metals using the E3 Duo Controller. 
This question more than any other: Can I electroform with silver or gold? The answer is yes you can.  Since electroforming in silver and gold is rare for the home studio, it is more likely that when people ask about electroforming, they really mean to be inquiring about plating. Both processes will be explained below:
Electroforming is traditionally done with copper and then plated later with other metals.  For practical reasons it would be massively expensive to electroform in pure gold or silver but it is possible. Also, gold and silver are relatively soft so it would take a lot of precious metal to form a strong layer over an object. Typically cyanide based gold and silver solutions are used for electroforming because the cyanide keeps the metal suspended in solution for long periods of plating. There are YouTube videos (mostly by commercial labs) and books out there on the subject if you Google electroforming with gold or silver.  To do this you would simply substitute gold or silver for the copper anode and use the appropriate plating solutions.
Gold and silver is most commonly achieved by plating which is covered in my 2nd topic below.
Will the E3 Duo Eform Controller plate other metals such as gold and silver?
The answer is yes. Simply use the controller in place of a rectifier and set it to a low current level while plating. Most plating solutions only take a few minutes. Each metal calls for different steps, solutions, anodes, equipment and safety concerns. Plating takes quite a bit of training and knowledge so be sure to research the steps of the particular metal and solution you want to use before committing to plating.
To give a brief overview of plating, plating is the process of applying a thin layer of metal over metal. To prepare a piece for plating the piece must be cleaned with an electro-cleaning solution and then dipped in acid prior to plating. The piece must also be rinsed between solutions to avoid contamination. The piece then goes through a series of steps involving heating and agitating the solution (if called for) as the metals are plated. If I were to get serious about plating different metals I would invest in a plating station unit like this one below because it provides heat and agitation to certain beakers where needed: 
http://www.riogrande.com/Product/Midas-Six-Station-Plating-System-1-Liter/331961?Pos=6
Certain metals cannot be plated over one another without a barrier layer of metal between. For example a layer of nickel should be plated between copper and gold to keep the gold from migrating with the silver. RioGrande.com has great charts on their website which can be found with each plating solution to show you the steps in order for plating. Here is an example of the information offered with the 24K gold cyanide solution: 
Along with knowledge of the steps and becoming familiar with the characteristics of each plating solution, the most important consideration is SAFETY. When you get into plating various metals you can be dealing with very dangerous chemicals. 24K gold is available in non-cyanide and Cyanide formulas. The cyanide is what makes the gold so rich and beautiful. But it can be fatal if misused. You need to wear a NIOSH mask, proper gloves, apron, goggles, and use a fume hood for ventilation just to name a few of the safety precautions.  If you go to Rio Grande’s website and study each plating solution it will make sense what is involved for plating. This is not a casual craft.
With all of this said, our controller is meant for the small jewelry-making studio for electroforming and plating on a small scale.  I electroform with copper frequently and then I plate those pieces with various metals occasionally. This piece was a leaf that I electroformed with copper and then it was plated with nickel followed with 14K gold.
Tuesday, June 2, 2015

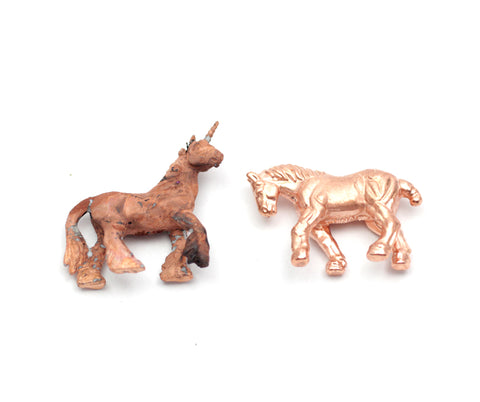
Successful Shiny Copper Plating: Get the power going first!

It's so important to turn on the power on BEFORE you submerge your piece in the copper plating solution!
Look at the unicorn toy on left, it was in copper plating solution no power for the first 5 minutes. The horse toy on right had power and current flowing right from the start!  Both toys were left for several hours to electroform.  The horse built a heavy layer of shiny copper, the unicorn never really formed other than a thin dull coat.
I’m always learning something new about electroforming and plating. This weekend Dan and I were electroforming pieces with copper and I put a prepared piece (covered with sealer and water-based graphite paint) into the copper plating solution without turning on the current. I left it there for about 5 minutes before turning the controller on. The result wasn’t good. The piece didn’t plate very well and the copper was a very dull salmon color. The next piece was a similar charm (small rubber toy) prepared in the same way. This time we turned the controller power on and the current was set to HIGH. The prepared piece was then submerged to begin the plating process. We left it on high for just about a minute and then set it to a medium setting until finished (several hours to electroform). The result was beautiful. The copper was bright and shiny with a thick deposition of copper. After several experiments we discovered two important things: 
  1. Always turn the power on first and then submerge the piece into the solution while the current is flowing.
  1. Start with your controller set on HIGH for about a minute to get the plating started. This will expedite the coverage of the copper over the graphite paint. Since the graphite paint is water soluble, this boost in current minimizes the amount of graphite that might flake or soak off had the piece been left longer before plating. We also think that the boost in current helps to limit the contamination to the solution that occurs when organic materials are electroformed. Even with a boost in current, organic materials still need to be sealed very well prior to applying conductive paint and plating.
I found that by making sure the power and current were on prior to plating, my solution stayed viable for many subsequent pieces.  I only had to add a few drops of brightener after plating 5-6 pieces.

Friday, January 16, 2015

Electroforming Question: Why is my piece dull and not plating?


Electroforming is easy, yet there is a lot to learn.  One of the most FAQs we get is: Why is the copper plating surface not bright and shiny? What am I doing wrong? This happens after plating a few pieces. It's frustrating because it's hard to understand why this suddenly happens when previous pieces plated just fine. The good news is that you can polish it to a high shine because it is simply rough copper. But make sure you formed the copper thick enough before sanding or polishing. Here is a pdf to explain why copper can look dull and how the acids are depleted from the plating solution, even after electroforming just a few pieces. The easiest answer is to buy new plating solution.  However, read this to understand the reasons why:  Maintaining your copper plating solution

Edited to add:
We also have a new video about how to shine up your piece with a brass brush and polishing pads!


Tuesday, September 30, 2014

The Elusive Snake Knot

Sneaky Snake Knot-Moonstone bracelet by Sherri Haab


Years ago I bought a bracelet in Santa Barbara, CA made with this knot. I wore the bracelet until it was shredded.  I didn't know what knot it was tied with and spent quite a long time trying to figure it out.  Later I found out it was a snake knot and found a few tutorials online.  This knot is a challenge to tie and is very time consuming, but well worth it.  I love the feel and the thickness the knot provides.  I used the knot to make this moonstone bracelet for a friend.  I feel the need to put up my own tutorial since this knot will not be featured in my new book coming May 2015.  In the meantime, search snake knot and practice, practice, practice!  Try Chinese knotting cord, waxed linen or nylon to tie the knot with.


Speaking of knots, here is a sneak peek of my new book,  coming this Spring!


Tuesday, February 14, 2012

Valentines


I love Valentine’s day goodies, and chocolate sugar cookies sounded really fun to make.

I found a good recipe on this blog: http://glorioustreats.blogspot.com/2011/01/chocolate-rolled-cookies-recipe.html Her cookies are gorgeous! Glory uses royal icing for her cookies and it produces perfect looking designs but I decided to go for a soft Butter-cream frosting instead.  The butter makes the frosting soft and creamy.  I adapted my recipe from memories of mother’s frosting we made for cakes and cookies.  

The recipe is:
1 lb confectioner’s sugar (powdered sugar)
¼ cup softened butter
1 tsp vanilla extract
Milk, add a Tbsp. at a time until you have a smooth creamy consistency.
Food coloring or cocoa powder for color
Decorative toppers and sprinkles

Use a mixer and cream the butter and vanilla with the powdered sugar.  Add the milk a little at a time until the frosting is smooth and creamy.  For sugar cookies I make the frosting a bit thinner than I would for cake.  It should spread easily with a knife.  If it is too thin it will drip off the edge of the cookie.  Too thick and it leaves lots of texture which is ok but the sprinkles won’t stick.  Frost a few cookies at a time and sprinkle decorative sugar on top while the frosting is still sticky.


Monday, February 13, 2012

CHA 2012


I’m trying to remember how many years it’s been since I attended my first CHA show.  I think I’ve been to at least 15-20 years worth (Laura has it been that long?).  In the beginning the show was called HIA and it was held twice a year rotating from one convention location to another year to year.   Back in the day you couldn’t even move down the aisles let alone push through to see a popular booth because so many people were there.  I remember studying the floor plan prior to walking the show floor just to make sure we didn’t miss anything or get lost in the miles of booths.  You only had to walk a day to learn that tennis shoes go with ANYTHING you brought to wear.  Over time things have changed, there are fewer booths and fewer attendees.  Even so I still look forward to the show.  

For me, CHA is rejuvenating.  I meet with vendors, customers, fellow designers, and spent time at my publisher’s booth.  So many people I’ve met over the years have become good friends and it’s nice to see them in person.  In the short time I was there I met up with Sonya Nimri who glowed with enthusiasm and excitement of being a mom and teacher.  As she zoomed in on kids craft ideas I found myself interested in kids crafts too now that I’m a grandma.  Yup, I can say it freely   “my name is Sherri and I’m a grandma!” but DON’T call me granny that’s pushing it too far.  I can still stay up all night and run a 5k.

Sherri & Sonya Nimri

I also ran into Suze Weinberg, Sara Hodson, Susan Kazmer, Jen Cushman, Jess Italia Lincoln, Jill MacKay, Ruth Rae, Jonathan Fong, just to name a few designers I admire.  Jewelry making is becoming more popular each year at CHA- Yay! 

Sara Hodson and Sherri Haab CHA 2012 photo from: http://suzeweinberg.typepad.com/

Wednesday, November 2, 2011

Sherri's on Jewel School!

Two bits of great news!

Sherri will be on Jewelry Television tomorrow from 10 - 12 Eastern Time. She will be demonstrating her ITS image transfer solution and the E3 Etch system. There will be great deals on special packages not available anywhere else. Find your JTV channel here:

http://www.jtv.com/on/demandware.store/Sites-jtv-Site/default/ChannelFinder-Show

Also, if you want to watch segments of Sherri on Jewel School, you can learn how to use ITS and make great personalized gifts for the holidays, and also how to rivet and how to etch with the E3 Etch system. It's like getting classes from Sherri for free! Here is the link to Jewel School:

http://www.jtv.com/Jewel-School/Jewel_school_weekly,default,pg.html#top

Scroll down to the icons with the episodes on the site and you'll find Sherri's classes.