Showing posts with label Electroforming. Show all posts

Friday, February 12, 2016

Electroforming Around Sea Glass

electroforming sea glass 

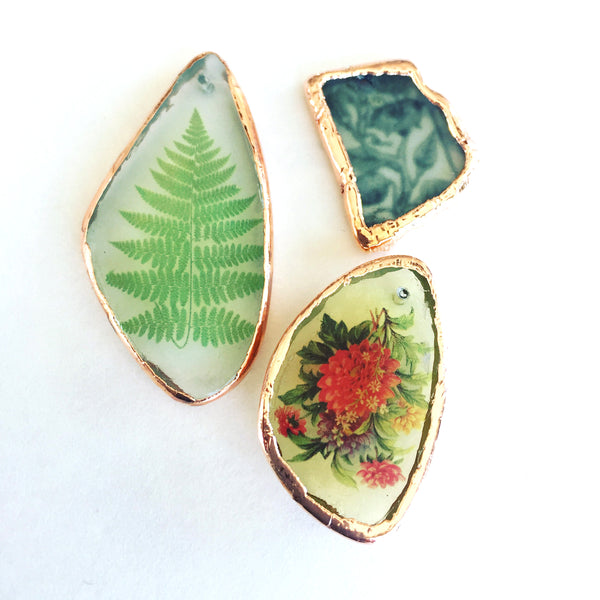
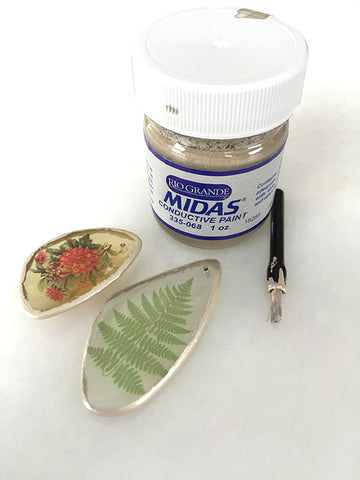
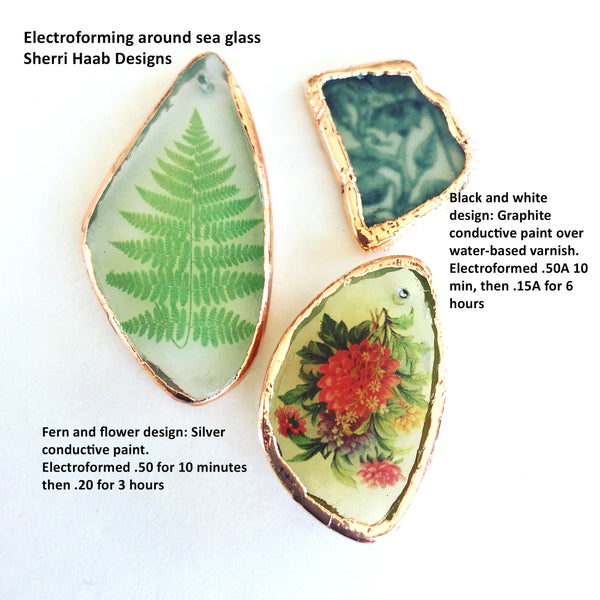
Here are a few pieces of sea glass that I electroformed with copper around the edges. I used both silver conductive paint and graphite paint to compare the differences in technique.  Silver paint is really sticky and so I simply painted around the edge of the glass with the paint with one coat and let the paint dry, done! For the graphite sample I added and extra step. First, I painted the edge of the glass with water-based varnish to help the graphite paint stick.  After the varnish dried I painted the edge with graphite paint.  Regardless of the paint you use, be sure to paint a bit over the edge so that the copper will "wrap" around the edge of the glass like a bezel.


Attach a wire making sure the wire touches the paint around the glass and then electroform.  I plated these one at a time with the following: .50A for 10 minutes and then 3-6 hours at .15A

  conductive paint electroforming sea glass 

The end result is the same with either conductive paint.  The little black and white sample (upper right) was painted with graphite.  And if you are wondering where the images came from, I used ITS to apply images to the glass prior to electroforming.  Sealer was used to make the images extra durable.

Testing Conductive Paints: The pretzel experiment

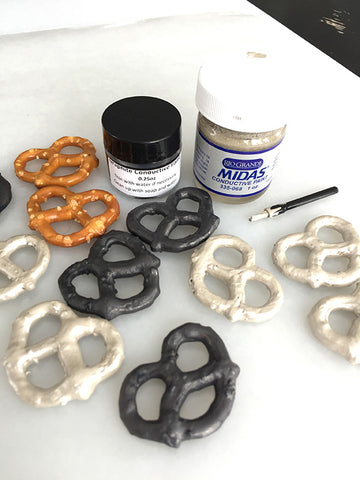
I’ve been promising to talk more about conductive paints, the differences in paints and what factors vary performance.  Although there are several types on the market, my two favorite paints are: water-based graphite paint and solvent based silver paint.  Both of these paints have appealing attributes and depending on what you are electroforming you may prefer one over the other.  I performed a side by side test using pretzels as a representation of any organic object you might electroform.
All of the pretzels were prepped and coated with two coats of water-based varnish using one of our disposable firm brushes.  Care was taken to cover the salt on the pretzels as well as to fill little pockets where the surface was chipped or broken to insure complete sealing of the pretzel.
Both sets were covered with one thin layer of the respective conductive paint.  The graphite paint was easier to apply than the silver and held detail well.  The silver paint was thicker and dried quickly.  In hindsight I might have had better results to thin the silver paint with lacquer thinner to remedy this. (You can buy thinner specifically for silver paint.)  I was able to rinse the graphite paint from the brushes with water. However, I tossed the brushes that were used with the silver paint. In either case the brushes were disposable so it wasn’t a big deal.
After the pretzels were dry, they were ready to electroform.  The silver coated pretzels were waterproof so they could be handled with wet hands and was not as vulnerable to washing off in the plating solution.  Graphite is really sensitive to moisture so care was taken to keep the graphite coated pretzels dry and then to make sure the current and power were on before submerging the pretzels into the electroforming solution.
 
(Click here to see a larger version of this image)

A copper conductive wire was attached to each of the first samples (one silver pretzel and one graphite pretzel) and each was lowered it’s own beaker to electroform. As with most projects, I turned the current up a bit to get the pieces going for about 10 minutes before lowering the current to complete the electroforming session.  The first thing I noticed is that the silver paint allowed the current to flow around the pretzel quickly and uniformly.  The graphite took a bit longer and I watched as the copper progressed to cover the surface.  Graphite is more sensitive to current that is set too high or too low more so than silver.  For this first round I had the current set at 1A which was too high for the graphite paint.  The wire built a crust on it quickly which then prevented the current from effectively coating the pretzel.  I found that .5A was better for the subsequent samples. I was able to remove the graphite pretzel after 10 minutes and replace the wire with a clean one which helped stop the build up and allowed me to continue electroforming the same piece without failure.  Both pieces were bright and shiny after several hours.
For the remainder of the samples I was amazed to see that even though the pretzels were coated with different paints and were electroformed separately, the finishes looked identical.  As you can see on the 2nd set of pretzels they both look as though the copper picked up a patina.  They both plated uniformly.  The copper could be polished later to change the color if desired. 
For the 3rd round, I added several droppers of brightener in both beakers to try to get the bright pure copper color back.  The silver paint was more forgiving of the chemistry change and plated just fine.   The graphite sample was slightly more “dull” or “flat” in sheen and also plated with some cracks and lines on the surface.  The brightener seems to have thrown things off a bit in the beaker on the graphite test side. Interestingly enough the subsequent pieces did better with the graphite side (I’m assuming the brightener became less potent over time with use).
The last set of pretzels worked out better than the 3rd round.  Even though there was a “patina” color on both samples, they were bright and shiny.  The brightener seemed to mellow to a good level and the solution was in good shape.  At this point, both beakers had quite a bit of debris in the bottom of each and so I strained the solutions through a coffee filter. The solution was still good to go, but won’t last indefinitely as it will eventually need more acid or to be replaced altogether.
In summary, both paints performed well to conduct electricity and to allow even plating.  Here is what I would say are the pros/cons of each. I personally use graphite most of the time.  I use silver occasionally for pieces where I’m at risk for the graphite washing off such as plating on smooth glass. Although you can paint on glass with graphite if you paint an undercoat of varnish to help it stick. See my post about electroforming on Sea glass.   For more information on other paints see my comparison pdf here: Comparing Conductive Paints for Electroforming.
Comparing graphite vs. silver paint:
Silver Conductive Paint - solvent based from Rio Grande
Pros:
  • Excellent conductivity-forgiving of wide range of current
  • Initial plating is fast
  • Good adhesion to smooth surfaces like glass
  • Made with silver
  • Good support from Rio Grande and widely used
Cons:
  • Thicker than water based paints, fine details may suffer
  • Expensive-follows the silver market price
  • Hard to clean up, must use solvent based paint remover to clean brushes, etc. contains Butyl Acetate
  • Safety precautions: respiration, skin and ingestion warnings
  • Flammable shipping restrictions
Graphite Paint - water based from Sherri Haab Designs
Pros:
  • Excellent conductivity
  • Small particle size to retain detail
  • Inexpensive in relation to silver
  • Can be thinned down and cleaned up easily with water
  • Works very well for fine work using an air brush when thinned down
  • You can see where electroforming is forming during process (easier to see than copper conductive paints)
  • Can be shipped by air and overseas and less hazardous than silver paint
Cons:
  • Sensitive to current levels (too much or too little current may arrest the plating process)
  • Does not stick well to smooth surfaces like glass, must use a “tacky” base such as water based varnish or white glue which will help the graphite paint to stick.
  • If it is thinned down with too much water it will bead like a watercolor paint and not adhere well when painted.
  • Contains ammonia, which some people may be sensitive to in concentrated amounts. 
  • Respirator must be worn when spraying for industrial use
  • Some people can be sensitive with dermal contact.  Gloves will prevent contact

Tuesday, June 9, 2015

Electroforming or Plating with Gold, Silver, and Other Metals


Electroforming or Plating with Gold, Silver or Other Metals
We get two questions more frequently than any others about electroforming and plating. This post is to answer both of these questions and to offer some new information about plating with various metals using the E3 Duo Controller. 
This question more than any other: Can I electroform with silver or gold? The answer is yes you can.  Since electroforming in silver and gold is rare for the home studio, it is more likely that when people ask about electroforming, they really mean to be inquiring about plating. Both processes will be explained below:
Electroforming is traditionally done with copper and then plated later with other metals.  For practical reasons it would be massively expensive to electroform in pure gold or silver but it is possible. Also, gold and silver are relatively soft so it would take a lot of precious metal to form a strong layer over an object. Typically cyanide based gold and silver solutions are used for electroforming because the cyanide keeps the metal suspended in solution for long periods of plating. There are YouTube videos (mostly by commercial labs) and books out there on the subject if you Google electroforming with gold or silver.  To do this you would simply substitute gold or silver for the copper anode and use the appropriate plating solutions.
Gold and silver is most commonly achieved by plating which is covered in my 2nd topic below.
Will the E3 Duo Eform Controller plate other metals such as gold and silver?
The answer is yes. Simply use the controller in place of a rectifier and set it to a low current level while plating. Most plating solutions only take a few minutes. Each metal calls for different steps, solutions, anodes, equipment and safety concerns. Plating takes quite a bit of training and knowledge so be sure to research the steps of the particular metal and solution you want to use before committing to plating.
To give a brief overview of plating, plating is the process of applying a thin layer of metal over metal. To prepare a piece for plating the piece must be cleaned with an electro-cleaning solution and then dipped in acid prior to plating. The piece must also be rinsed between solutions to avoid contamination. The piece then goes through a series of steps involving heating and agitating the solution (if called for) as the metals are plated. If I were to get serious about plating different metals I would invest in a plating station unit like this one below because it provides heat and agitation to certain beakers where needed: 
http://www.riogrande.com/Product/Midas-Six-Station-Plating-System-1-Liter/331961?Pos=6
Certain metals cannot be plated over one another without a barrier layer of metal between. For example a layer of nickel should be plated between copper and gold to keep the gold from migrating with the silver. RioGrande.com has great charts on their website which can be found with each plating solution to show you the steps in order for plating. Here is an example of the information offered with the 24K gold cyanide solution: 
Along with knowledge of the steps and becoming familiar with the characteristics of each plating solution, the most important consideration is SAFETY. When you get into plating various metals you can be dealing with very dangerous chemicals. 24K gold is available in non-cyanide and Cyanide formulas. The cyanide is what makes the gold so rich and beautiful. But it can be fatal if misused. You need to wear a NIOSH mask, proper gloves, apron, goggles, and use a fume hood for ventilation just to name a few of the safety precautions.  If you go to Rio Grande’s website and study each plating solution it will make sense what is involved for plating. This is not a casual craft.
With all of this said, our controller is meant for the small jewelry-making studio for electroforming and plating on a small scale.  I electroform with copper frequently and then I plate those pieces with various metals occasionally. This piece was a leaf that I electroformed with copper and then it was plated with nickel followed with 14K gold.

Tuesday, June 2, 2015

Successful Shiny Copper Plating: Get the power going first!

It's so important to turn on the power on BEFORE you submerge your piece in the copper plating solution!
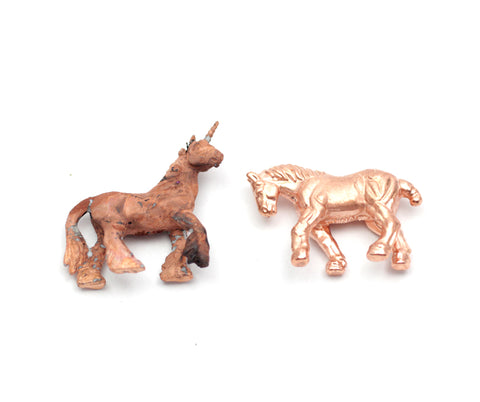
Look at the unicorn toy on left, it was in copper plating solution no power for the first 5 minutes. The horse toy on right had power and current flowing right from the start!  Both toys were left for several hours to electroform.  The horse built a heavy layer of shiny copper, the unicorn never really formed other than a thin dull coat.
I’m always learning something new about electroforming and plating. This weekend Dan and I were electroforming pieces with copper and I put a prepared piece (covered with sealer and water-based graphite paint) into the copper plating solution without turning on the current. I left it there for about 5 minutes before turning the controller on. The result wasn’t good. The piece didn’t plate very well and the copper was a very dull salmon color. The next piece was a similar charm (small rubber toy) prepared in the same way. This time we turned the controller power on and the current was set to HIGH. The prepared piece was then submerged to begin the plating process. We left it on high for just about a minute and then set it to a medium setting until finished (several hours to electroform). The result was beautiful. The copper was bright and shiny with a thick deposition of copper. After several experiments we discovered two important things: 
  1. Always turn the power on first and then submerge the piece into the solution while the current is flowing.
  1. Start with your controller set on HIGH for about a minute to get the plating started. This will expedite the coverage of the copper over the graphite paint. Since the graphite paint is water soluble, this boost in current minimizes the amount of graphite that might flake or soak off had the piece been left longer before plating. We also think that the boost in current helps to limit the contamination to the solution that occurs when organic materials are electroformed. Even with a boost in current, organic materials still need to be sealed very well prior to applying conductive paint and plating.
I found that by making sure the power and current were on prior to plating, my solution stayed viable for many subsequent pieces.  I only had to add a few drops of brightener after plating 5-6 pieces.

Friday, January 16, 2015

Electroforming Question: Why is my piece dull and not plating?


Electroforming is easy, yet there is a lot to learn.  One of the most FAQs we get is: Why is the copper plating surface not bright and shiny? What am I doing wrong? This happens after plating a few pieces. It's frustrating because it's hard to understand why this suddenly happens when previous pieces plated just fine. The good news is that you can polish it to a high shine because it is simply rough copper. But make sure you formed the copper thick enough before sanding or polishing. Here is a pdf to explain why copper can look dull and how the acids are depleted from the plating solution, even after electroforming just a few pieces. The easiest answer is to buy new plating solution.  However, read this to understand the reasons why:  Maintaining your copper plating solution

Edited to add:
We also have a new video about how to shine up your piece with a brass brush and polishing pads!


Monday, September 12, 2011

Electroforming Tips - Keep it Moving, Keep it Warm

On a recent visit to the studio of jewelry artist Nancy Worden, she was gracious enough to educate me on some of her valuable tips for electroforming. Nothing can replace the years of experience she gained through her labors, and with plating there are no easy shortcuts. I am anxious to pass along a few vital steps I learned from her:

KEEP IT MOVING: Agitation reduces the sharp and uneven build-up of copper particles on your piece. This is especially true for pieces that are left to be electroformed for long periods of time. If you have ever left a certain piece to build a heavy layer of copper for a long time, you may have noticed that the edges or protrusions feel sharp or rough. By providing a way to circulate the free floating copper particles, the result will be more rounded edges which do not feel as sharp. It may be of interest to note that Polypropylene anode bags also play a role in keeping the particles from forming sharply.
A simple solution? An Aquarium air pump. To make your own bubbling device, drill holes in a piece of tubing to be fitted to the pump. In this photo you can see how a slightly larger tube was drilled and fitted over the longer green tube which fits snuggly to the pump. The end with holes in it is placed in the electroforming solution about 30 minutes to an hour after the initial coat of copper is formed. Turn the pump on to provide agitation for the remaining time necessary for electroforming.

KEEP IT WARM: Optimal temperature for electroforming copper is between 75 and 80 degrees fahrenheit. Nancy Worden has found through years of experimentation that this produces the best results. You can use warming devices such as an electric heating pad to heat the tank, especially in winter. Use safety precautions when using electric devices near water.

MAINTAINING THE ELECTROFORMING SOLUTION: There is no easy answer for this one. This can get very complicated, and frankly dangerous, if you start adding acids or experimenting without some knowledge and respect for electrochemistry. Artists like Nancy have their own protocol for maintaining and attending to the plating bath. As every situation is unique, you have to take responsibility for deeper education and study. There are pdf's and books online that are written for associated products from the plating industry for detailed information. You have to decide at some point whether the goal for using the solutions is for a personal hobby, mass production, or an industrial studio set-up. The latter involves getting to know the chemicals and developing a personal knowledge for how and what to do to keep the plating solutions clean and filtered, and the ph levels even. Most solutions sold for small studio or hobby use are sold with the premise that they will be used until exhausted (at a certain coverage rate) and then replenished as needed.

SOME METALS DON'T PLATE: With any art or science like electroforming, there are always new things to learn. One thing I learned recently is that there are certain metals which will not successfully plate with copper without pre-treatment. Steel, iron, or metal with tin in it will not plate well.

 - Sherri

Sunday, June 5, 2011

Artist Spotlight - Keith Lo Bue

While in Sydney, I met artist Keith Lo Bue. He attended my workshops at the Eclectic Studio where he frequently teaches. He also teaches in the U.S., and I have seen him at various retreats in the past, but I've never had the pleasure of talking to him about his art.


I love that he calls his art blog "Stuffsmith," because that's what he does--he makes all kinds of mixed media art out of stuff. These are all pictures of his work. You can see more at his blog here.


The electroplating really inspired him. I can't wait to see how he incorporates plating into his work.


Here is a blog post where he details the steps for electroforming a starfish. He then makes a ring with the copper starfish by cold connecting it to a broken teacup. How clever is that?


Keith's mixed media jewelry classes are very popular abroad and in the United States. If you can't catch him in person, he also sells e-books and DVDs on his website here.

Tuesday, May 31, 2011

Workshops in Australia


While in Australia, I taught a two-day workshop on electroforming and plating. I enjoyed the group and their enthusiasm. I especially appreciated their good humor when our copper plating solution was lacking the necessary acid needed for successful plating on the first day of class. It's not like I can travel with that stuff, so I'm at the mercy of local sources. I lost a bit of sleep that night trying to figure out how to rescue the pieces.

Luckily, Keith Lo Bue, a well-known jewelry artist and teacher came to the rescue. He was attending the class, and just happened to have some hydrochloric acid at home, which he brought in for day two. It worked great, and we were able to finish quite a few pieces. Then we proceeded to plate several of the pieces with gold, silver and nickel using prepared plating solutions. Check out the results in the photo above.

On the second day of the workshop, we etched on copper and then applied images on nickel silver. Then we riveted the pieces together to make mixed-media bracelets. I was so busy, I forgot to take pictures, but the projects were based on my sample shown in this photo.

Friday, April 15, 2011

Easter Necklace


For those of us who have, or have used, one of Sherri’s E3 Electroform machines, nothing is safe from the question, “Could I plate this in copper?” We eye commonly plated natural things like leaves and sticks, but nothing escapes the imagination. I have a pink Barbie shoe on my desk that is destined to become a copper charm, and I once briefly considered the ladybug I found on my sweater.

Proof of the quirky things that can become jewelry is this cheap plastic rabbit trinket that Sherri turned into an elegant copper pendant for Easter. She added a wire loop before processing so it could be made into a necklace. If you would like to learn more about the E3 Electroform, check here.

Wednesday, March 30, 2011

Electroforming in Orange County


The best thing about electroforming classes is the variety of objects the students bring in to process. Just take a look at this collection of finished projects from Sherri’s February class at Brea Bead Works in Brea, California. Students electroformed seashells, glass, polymer clay, leaves, acorns and even lace fabric. With results like this, it’s no wonder Electroforming is becoming Sherri’s most popular class.


In addition to the all-day electroforming class, the next day Sherri taught her popular class on doing image transfers on metal clay. She was grateful for the assistance of Cassy Muronaka, and daughter Michelle, who helped tremendously even with baby Adeline in tow.

Cassy is a jewelry artist herself, and has made some amazing things using Sherri’s E3 Electroforming kit. Check out her blog on her first experiments here (note that the E3 Electroforming kit is now sold separately from the E3 Etch kit). Cassy has also done some exciting work electroforming on polymer clay, which she graciously shares in a multi-part blog. Follow her process and experiments, and see her amazing finished pieces starting here.

Sherri will teach at Brea Bead Works again on May 14th and 15th, so if this looks like fun, please come join us. Brea Bead Works features a variety of classes with local and visiting instructors. They offer a preview event prior to each quarter so customers can view class samples and meet instructors, and then be prepared to register for classes, which sometimes sell out quickly. Check out their impressive list of workshops at breabeadworks.com.

Wednesday, November 10, 2010

Electroforming Adventures


Dan and I have been running as fast as we can to keep up with the tasks associated with supporting our metal etching and electroforming products. We have been updating techniques and supplies as we find new and improved ways of doing things. For the past year we have taught people how to etch and electroform in classes around the country so they will understand the finer points of how these processes work and how to implement the techniques for jewelry design. In our etching classes, we used to say “oh and by the way, you can electroform using similar technology”. Well, as soon as people heard the word electroforming it’s like you just asked them to take a physics test or something. When a few open minded event organizers posted electroforming classes, adventurous students who were not easily intimidated signed up. No one was more enlightened than me about the awesome results. People copper coated everything imaginable from old jewelry pieces to sea shells. Some of the more unusual pieces included leather, a small animal jawbone and a gecko lizard! I call it the Rumpelstiltskin effect because once a common thing is turned into shiny metal it becomes something precious. And then to top it off you can plate copper with whatever metal you choose. With gold and silver being at ridiculous prices, plating is definitely an appealing choice for jewelry making. I’m pretty excited about the buzz and enthusiasm our electroforming classes are generating. We’ve even been mentioned on Polymer Clay Daily!
http://polymerclaydaily.com/2010/11/05/electroforming-and-polymer/
Thank you Cynthia
I have been receiving quite a few email inquiries about electroforming for polymer clay. You can electroform copper over almost anything as long as it won’t dissolve or change the ph of the copper electroforming solution, so polymer clay is an excellent core material. Or if you prefer to simply embellish or surround with a copper bezel allowing the polymer to show through that is another application. Polymer does not require sealing like organic materials and it can be formed or molded into any shape you wish. It is fairly inexpensive and easy to obtain. I am very excited about the artists who are using our E3 Etch/Eform controller with polymer clay. Check out work by Cassy Muronaka http://cassymuronaka.wordpress.com/


Cassy Muronaka has a multi-part series posted all about her adventures with electroforming. She shares her “happy accidents” that we can all learn from. I am grateful for her tireless experimentation because it has led to many new ideas


Janice Abarbanel’s blog is a visual and informational treat. If you scroll down the past few posts she shares various designs and also etched silver pieces. She is amazing!
I love the work they have been producing and the information they freely share is worth pouring over.

Sunday, July 25, 2010

Summer Classes and Art Saves

This week I will be the featured artist on Art Saves by Jenny Doh. You can read a bit about why I love to create and visit a few of my favorite links. She has a great blog with lots of inspiring stories.


This summer has been flying by with lots of travel, classes and just hard work in general. We attended the Bead and Button Show in WI, here we are at the booth (Rachel Haab, Rachel Wright, myself and Michelle Haab-with baby Adeline on the way). We worked so hard, we often missed 2 out of 3 meals and lived on 4-6 hours of sleep all week but had fun meeting people and working together.

One of the classes I taught at the show combined metal clay, fine silver and images transferred to faux bone. It was A LOT to master in one class but I think the end results were stunning. This is a piece made by Erin Prais-Hintz. She transferred images to both sides and then set the piece in the metal clay so that the back is as pretty as the front.


Another hot technique we are teaching this summer is electroforming. I think I have more fun than the students. They bring interesting objects to form into copper to class. This piece was made at Art and Soul in VA by Judy Harris. She finished it with pearls and wore the finished piece as a pin. It is lovely and she also made matching earrings. I am hoping to teach this class again soon. We are really happy with the new electroform controller and the use of graphite paint for this technique. Electroforming and plating is surprisingly easy.
This week I am headed to the PMC conference in Purdue, and then off to Phoenix for Art Unraveled the following week to teach classes using copper clay, resin clay and fine silver clay.

Thursday, June 18, 2009

Electroforming Twigs


Dan completed the process for using our E3 Etch controller to do elecroforming. I made these copper coated twigs with it. This is accomplished by using an adapter with our controller, that will be available for a minimal cost. I can’t wait to try this to plate gold onto copper and bronze. We will have a tutorial and supplies up on our website and shop by next week www.sherrihaab.com along with a bunch of other new items.

The puget sound bead festival is coming up fast, so if you are looking for a class in the Northwest this summer I will be there. We will be teaching green methods of etching on metal, even silver! (same controller that does the electroforming) and also a new class I am excited about- making your own Pandora style beads. Here is the direct link to sign up for classes:

http://www.pugetsoundbeadfestival.com/store/manufacturers.php?manufacturerid=33