Thursday, December 28, 2017

Nickel Plating with New Graphite Paint

This piece started with a 3D printed figure made by my son David.  I coated it with a thin layer of our new acrylic graphite paint, applied directly to the plastic without a sealer underneath. It was electroformed with copper and then plated with nickel silver to finish.

Stir the graphite paint and then apply a thin later of paint over the plastic.  I use a stiff brush to "scrub" the paint into crevices with a dry brush technique to retain details. This paint has an acrylic stabilizer to keep it from flaking or rinsing off in solution.  Let the paint dry throughly.  I use a blow dryer to speed things up. Check for any missing spots and touch up as needed. Note: If you are using the paint on an organic object you will want to seal it first.

Attach a copper wire prior to electroforming. This piece was started on a current level of about .60  I moved the wire after about an hour of plating and then a few more times to keep it from sticking. As I pulled the piece to move the wire I noticed a few places that needed to be touched up. The piece was rinsed with distilled water and I applied paint in a few spots where the plating was missing. After drying I wrapped the wire around the piece and returned to the plating bath.  I reduced the current to .45 and electroformed for about 8-10 hours.
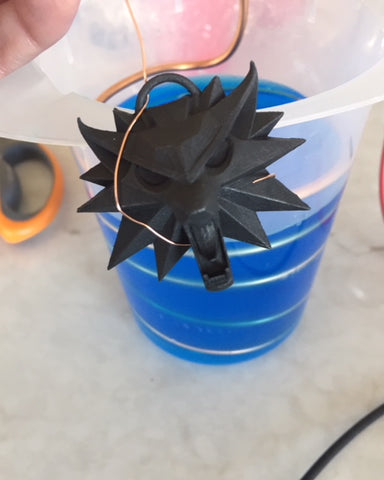
Graphite paint ready for electroforming

Here is the piece after copper electroforming.
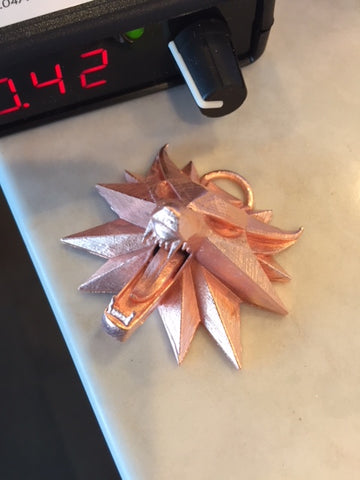
Copper electroformed 3D printed object

Here's where I step aside and let these two crazy guys take over.  David is my son and Dan is my husband (otherwise known as the engineer who created all of the technology and techniques for our products). The piece is being electro-cleaned with Rio Grande Electro-Clean solution. They used a stainless steel anode and we heated the solution by placing it on a rice bag that was heated for a few minutes in the microwave.  We never do anything very sophisticated but there are fancier methods for heating plating solutions. This process only takes a few minutes.
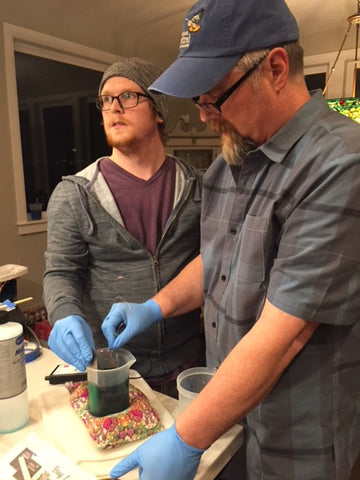
Electro-clean after electroforming

Be sure and follow safety precautions as directed on products like Nickel plating solution.
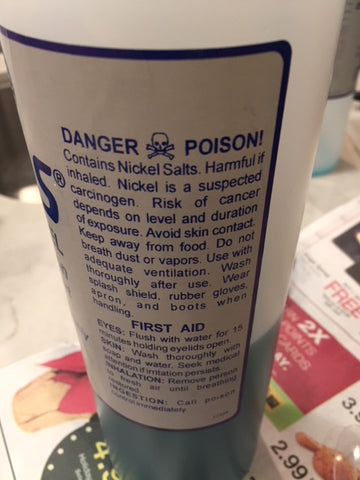
Safety first-Nickel plating solution

After electro-cleaning, Dan and David plated the piece with Bright Nickel (Midas Bright Nickel from Rio Grande).  They used a nickel anode and it took about 5 minutes to fully plate.  As you can see the piece has a lot of deep crevices and so the plating takes longer than an simple shape would. 
Nickel Plated 3D model

Here is the nickel plated piece! David added red glass rhinestone eyes to finish the piece and added a chain to gift this to his lovely wife for Christmas.
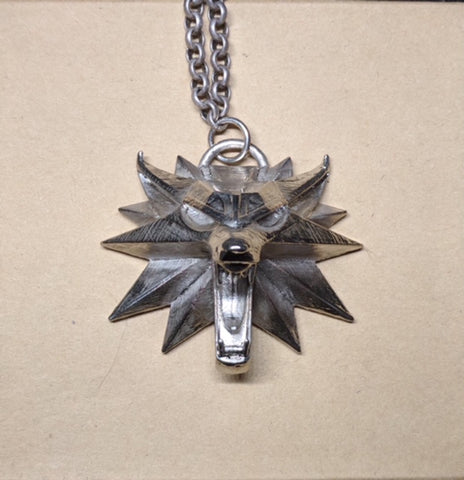
Nickel plated 3D wolf-David Haab


Friday, February 12, 2016

Electroforming Around Sea Glass

electroforming sea glass 

Here are a few pieces of sea glass that I electroformed with copper around the edges. I used both silver conductive paint and graphite paint to compare the differences in technique.  Silver paint is really sticky and so I simply painted around the edge of the glass with the paint with one coat and let the paint dry, done! For the graphite sample I added and extra step. First, I painted the edge of the glass with water-based varnish to help the graphite paint stick.  After the varnish dried I painted the edge with graphite paint.  Regardless of the paint you use, be sure to paint a bit over the edge so that the copper will "wrap" around the edge of the glass like a bezel.


Attach a wire making sure the wire touches the paint around the glass and then electroform.  I plated these one at a time with the following: .50A for 10 minutes and then 3-6 hours at .15A

  conductive paint electroforming sea glass 

The end result is the same with either conductive paint.  The little black and white sample (upper right) was painted with graphite.  And if you are wondering where the images came from, I used ITS to apply images to the glass prior to electroforming.  Sealer was used to make the images extra durable.

Testing Conductive Paints: The pretzel experiment

I’ve been promising to talk more about conductive paints, the differences in paints and what factors vary performance.  Although there are several types on the market, my two favorite paints are: water-based graphite paint and solvent based silver paint.  Both of these paints have appealing attributes and depending on what you are electroforming you may prefer one over the other.  I performed a side by side test using pretzels as a representation of any organic object you might electroform.
All of the pretzels were prepped and coated with two coats of water-based varnish using one of our disposable firm brushes.  Care was taken to cover the salt on the pretzels as well as to fill little pockets where the surface was chipped or broken to insure complete sealing of the pretzel.
Both sets were covered with one thin layer of the respective conductive paint.  The graphite paint was easier to apply than the silver and held detail well.  The silver paint was thicker and dried quickly.  In hindsight I might have had better results to thin the silver paint with lacquer thinner to remedy this. (You can buy thinner specifically for silver paint.)  I was able to rinse the graphite paint from the brushes with water. However, I tossed the brushes that were used with the silver paint. In either case the brushes were disposable so it wasn’t a big deal.
After the pretzels were dry, they were ready to electroform.  The silver coated pretzels were waterproof so they could be handled with wet hands and was not as vulnerable to washing off in the plating solution.  Graphite is really sensitive to moisture so care was taken to keep the graphite coated pretzels dry and then to make sure the current and power were on before submerging the pretzels into the electroforming solution.
 
(Click here to see a larger version of this image)

A copper conductive wire was attached to each of the first samples (one silver pretzel and one graphite pretzel) and each was lowered it’s own beaker to electroform. As with most projects, I turned the current up a bit to get the pieces going for about 10 minutes before lowering the current to complete the electroforming session.  The first thing I noticed is that the silver paint allowed the current to flow around the pretzel quickly and uniformly.  The graphite took a bit longer and I watched as the copper progressed to cover the surface.  Graphite is more sensitive to current that is set too high or too low more so than silver.  For this first round I had the current set at 1A which was too high for the graphite paint.  The wire built a crust on it quickly which then prevented the current from effectively coating the pretzel.  I found that .5A was better for the subsequent samples. I was able to remove the graphite pretzel after 10 minutes and replace the wire with a clean one which helped stop the build up and allowed me to continue electroforming the same piece without failure.  Both pieces were bright and shiny after several hours.
For the remainder of the samples I was amazed to see that even though the pretzels were coated with different paints and were electroformed separately, the finishes looked identical.  As you can see on the 2nd set of pretzels they both look as though the copper picked up a patina.  They both plated uniformly.  The copper could be polished later to change the color if desired. 
For the 3rd round, I added several droppers of brightener in both beakers to try to get the bright pure copper color back.  The silver paint was more forgiving of the chemistry change and plated just fine.   The graphite sample was slightly more “dull” or “flat” in sheen and also plated with some cracks and lines on the surface.  The brightener seems to have thrown things off a bit in the beaker on the graphite test side. Interestingly enough the subsequent pieces did better with the graphite side (I’m assuming the brightener became less potent over time with use).
The last set of pretzels worked out better than the 3rd round.  Even though there was a “patina” color on both samples, they were bright and shiny.  The brightener seemed to mellow to a good level and the solution was in good shape.  At this point, both beakers had quite a bit of debris in the bottom of each and so I strained the solutions through a coffee filter. The solution was still good to go, but won’t last indefinitely as it will eventually need more acid or to be replaced altogether.
In summary, both paints performed well to conduct electricity and to allow even plating.  Here is what I would say are the pros/cons of each. I personally use graphite most of the time.  I use silver occasionally for pieces where I’m at risk for the graphite washing off such as plating on smooth glass. Although you can paint on glass with graphite if you paint an undercoat of varnish to help it stick. See my post about electroforming on Sea glass.   For more information on other paints see my comparison pdf here: Comparing Conductive Paints for Electroforming.
Comparing graphite vs. silver paint:
Silver Conductive Paint - solvent based from Rio Grande
Pros:
  • Excellent conductivity-forgiving of wide range of current
  • Initial plating is fast
  • Good adhesion to smooth surfaces like glass
  • Made with silver
  • Good support from Rio Grande and widely used
Cons:
  • Thicker than water based paints, fine details may suffer
  • Expensive-follows the silver market price
  • Hard to clean up, must use solvent based paint remover to clean brushes, etc. contains Butyl Acetate
  • Safety precautions: respiration, skin and ingestion warnings
  • Flammable shipping restrictions
Graphite Paint - water based from Sherri Haab Designs
Pros:
  • Excellent conductivity
  • Small particle size to retain detail
  • Inexpensive in relation to silver
  • Can be thinned down and cleaned up easily with water
  • Works very well for fine work using an air brush when thinned down
  • You can see where electroforming is forming during process (easier to see than copper conductive paints)
  • Can be shipped by air and overseas and less hazardous than silver paint
Cons:
  • Sensitive to current levels (too much or too little current may arrest the plating process)
  • Does not stick well to smooth surfaces like glass, must use a “tacky” base such as water based varnish or white glue which will help the graphite paint to stick.
  • If it is thinned down with too much water it will bead like a watercolor paint and not adhere well when painted.
  • Contains ammonia, which some people may be sensitive to in concentrated amounts. 
  • Respirator must be worn when spraying for industrial use
  • Some people can be sensitive with dermal contact.  Gloves will prevent contact

Tuesday, June 9, 2015

Electroforming or Plating with Gold, Silver, and Other Metals


Electroforming or Plating with Gold, Silver or Other Metals
We get two questions more frequently than any others about electroforming and plating. This post is to answer both of these questions and to offer some new information about plating with various metals using the E3 Duo Controller. 
This question more than any other: Can I electroform with silver or gold? The answer is yes you can.  Since electroforming in silver and gold is rare for the home studio, it is more likely that when people ask about electroforming, they really mean to be inquiring about plating. Both processes will be explained below:
Electroforming is traditionally done with copper and then plated later with other metals.  For practical reasons it would be massively expensive to electroform in pure gold or silver but it is possible. Also, gold and silver are relatively soft so it would take a lot of precious metal to form a strong layer over an object. Typically cyanide based gold and silver solutions are used for electroforming because the cyanide keeps the metal suspended in solution for long periods of plating. There are YouTube videos (mostly by commercial labs) and books out there on the subject if you Google electroforming with gold or silver.  To do this you would simply substitute gold or silver for the copper anode and use the appropriate plating solutions.
Gold and silver is most commonly achieved by plating which is covered in my 2nd topic below.
Will the E3 Duo Eform Controller plate other metals such as gold and silver?
The answer is yes. Simply use the controller in place of a rectifier and set it to a low current level while plating. Most plating solutions only take a few minutes. Each metal calls for different steps, solutions, anodes, equipment and safety concerns. Plating takes quite a bit of training and knowledge so be sure to research the steps of the particular metal and solution you want to use before committing to plating.
To give a brief overview of plating, plating is the process of applying a thin layer of metal over metal. To prepare a piece for plating the piece must be cleaned with an electro-cleaning solution and then dipped in acid prior to plating. The piece must also be rinsed between solutions to avoid contamination. The piece then goes through a series of steps involving heating and agitating the solution (if called for) as the metals are plated. If I were to get serious about plating different metals I would invest in a plating station unit like this one below because it provides heat and agitation to certain beakers where needed: 
http://www.riogrande.com/Product/Midas-Six-Station-Plating-System-1-Liter/331961?Pos=6
Certain metals cannot be plated over one another without a barrier layer of metal between. For example a layer of nickel should be plated between copper and gold to keep the gold from migrating with the silver. RioGrande.com has great charts on their website which can be found with each plating solution to show you the steps in order for plating. Here is an example of the information offered with the 24K gold cyanide solution: 
Along with knowledge of the steps and becoming familiar with the characteristics of each plating solution, the most important consideration is SAFETY. When you get into plating various metals you can be dealing with very dangerous chemicals. 24K gold is available in non-cyanide and Cyanide formulas. The cyanide is what makes the gold so rich and beautiful. But it can be fatal if misused. You need to wear a NIOSH mask, proper gloves, apron, goggles, and use a fume hood for ventilation just to name a few of the safety precautions.  If you go to Rio Grande’s website and study each plating solution it will make sense what is involved for plating. This is not a casual craft.
With all of this said, our controller is meant for the small jewelry-making studio for electroforming and plating on a small scale.  I electroform with copper frequently and then I plate those pieces with various metals occasionally. This piece was a leaf that I electroformed with copper and then it was plated with nickel followed with 14K gold.

Tuesday, June 2, 2015

Successful Shiny Copper Plating: Get the power going first!

It's so important to turn on the power on BEFORE you submerge your piece in the copper plating solution!
Look at the unicorn toy on left, it was in copper plating solution no power for the first 5 minutes. The horse toy on right had power and current flowing right from the start!  Both toys were left for several hours to electroform.  The horse built a heavy layer of shiny copper, the unicorn never really formed other than a thin dull coat.
I’m always learning something new about electroforming and plating. This weekend Dan and I were electroforming pieces with copper and I put a prepared piece (covered with sealer and water-based graphite paint) into the copper plating solution without turning on the current. I left it there for about 5 minutes before turning the controller on. The result wasn’t good. The piece didn’t plate very well and the copper was a very dull salmon color. The next piece was a similar charm (small rubber toy) prepared in the same way. This time we turned the controller power on and the current was set to HIGH. The prepared piece was then submerged to begin the plating process. We left it on high for just about a minute and then set it to a medium setting until finished (several hours to electroform). The result was beautiful. The copper was bright and shiny with a thick deposition of copper. After several experiments we discovered two important things: 
  1. Always turn the power on first and then submerge the piece into the solution while the current is flowing.
  1. Start with your controller set on HIGH for about a minute to get the plating started. This will expedite the coverage of the copper over the graphite paint. Since the graphite paint is water soluble, this boost in current minimizes the amount of graphite that might flake or soak off had the piece been left longer before plating. We also think that the boost in current helps to limit the contamination to the solution that occurs when organic materials are electroformed. Even with a boost in current, organic materials still need to be sealed very well prior to applying conductive paint and plating.
I found that by making sure the power and current were on prior to plating, my solution stayed viable for many subsequent pieces.  I only had to add a few drops of brightener after plating 5-6 pieces.

Friday, January 16, 2015

Electroforming Question: Why is my piece dull and not plating?


Electroforming is easy, yet there is a lot to learn.  One of the most FAQs we get is: Why is the copper plating surface not bright and shiny? What am I doing wrong? This happens after plating a few pieces. It's frustrating because it's hard to understand why this suddenly happens when previous pieces plated just fine. The good news is that you can polish it to a high shine because it is simply rough copper. But make sure you formed the copper thick enough before sanding or polishing. Here is a pdf to explain why copper can look dull and how the acids are depleted from the plating solution, even after electroforming just a few pieces. The easiest answer is to buy new plating solution.  However, read this to understand the reasons why:  Maintaining your copper plating solution

Edited to add:
We also have a new video about how to shine up your piece with a brass brush and polishing pads!


Tuesday, September 30, 2014

The Elusive Snake Knot

Sneaky Snake Knot-Moonstone bracelet by Sherri Haab


Years ago I bought a bracelet in Santa Barbara, CA made with this knot. I wore the bracelet until it was shredded.  I didn't know what knot it was tied with and spent quite a long time trying to figure it out.  Later I found out it was a snake knot and found a few tutorials online.  This knot is a challenge to tie and is very time consuming, but well worth it.  I love the feel and the thickness the knot provides.  I used the knot to make this moonstone bracelet for a friend.  I feel the need to put up my own tutorial since this knot will not be featured in my new book coming May 2015.  In the meantime, search snake knot and practice, practice, practice!  Try Chinese knotting cord, waxed linen or nylon to tie the knot with.


Speaking of knots, here is a sneak peek of my new book,  coming this Spring!


Tuesday, February 14, 2012

Valentines


I love Valentine’s day goodies, and chocolate sugar cookies sounded really fun to make.

I found a good recipe on this blog: http://glorioustreats.blogspot.com/2011/01/chocolate-rolled-cookies-recipe.html Her cookies are gorgeous! Glory uses royal icing for her cookies and it produces perfect looking designs but I decided to go for a soft Butter-cream frosting instead.  The butter makes the frosting soft and creamy.  I adapted my recipe from memories of mother’s frosting we made for cakes and cookies.  

The recipe is:
1 lb confectioner’s sugar (powdered sugar)
¼ cup softened butter
1 tsp vanilla extract
Milk, add a Tbsp. at a time until you have a smooth creamy consistency.
Food coloring or cocoa powder for color
Decorative toppers and sprinkles

Use a mixer and cream the butter and vanilla with the powdered sugar.  Add the milk a little at a time until the frosting is smooth and creamy.  For sugar cookies I make the frosting a bit thinner than I would for cake.  It should spread easily with a knife.  If it is too thin it will drip off the edge of the cookie.  Too thick and it leaves lots of texture which is ok but the sprinkles won’t stick.  Frost a few cookies at a time and sprinkle decorative sugar on top while the frosting is still sticky.


Monday, February 13, 2012

CHA 2012


I’m trying to remember how many years it’s been since I attended my first CHA show.  I think I’ve been to at least 15-20 years worth (Laura has it been that long?).  In the beginning the show was called HIA and it was held twice a year rotating from one convention location to another year to year.   Back in the day you couldn’t even move down the aisles let alone push through to see a popular booth because so many people were there.  I remember studying the floor plan prior to walking the show floor just to make sure we didn’t miss anything or get lost in the miles of booths.  You only had to walk a day to learn that tennis shoes go with ANYTHING you brought to wear.  Over time things have changed, there are fewer booths and fewer attendees.  Even so I still look forward to the show.  

For me, CHA is rejuvenating.  I meet with vendors, customers, fellow designers, and spent time at my publisher’s booth.  So many people I’ve met over the years have become good friends and it’s nice to see them in person.  In the short time I was there I met up with Sonya Nimri who glowed with enthusiasm and excitement of being a mom and teacher.  As she zoomed in on kids craft ideas I found myself interested in kids crafts too now that I’m a grandma.  Yup, I can say it freely   “my name is Sherri and I’m a grandma!” but DON’T call me granny that’s pushing it too far.  I can still stay up all night and run a 5k.

Sherri & Sonya Nimri

I also ran into Suze Weinberg, Sara Hodson, Susan Kazmer, Jen Cushman, Jess Italia Lincoln, Jill MacKay, Ruth Rae, Jonathan Fong, just to name a few designers I admire.  Jewelry making is becoming more popular each year at CHA- Yay! 

Sara Hodson and Sherri Haab CHA 2012 photo from: http://suzeweinberg.typepad.com/

Wednesday, November 2, 2011

Sherri's on Jewel School!

Two bits of great news!

Sherri will be on Jewelry Television tomorrow from 10 - 12 Eastern Time. She will be demonstrating her ITS image transfer solution and the E3 Etch system. There will be great deals on special packages not available anywhere else. Find your JTV channel here:

http://www.jtv.com/on/demandware.store/Sites-jtv-Site/default/ChannelFinder-Show

Also, if you want to watch segments of Sherri on Jewel School, you can learn how to use ITS and make great personalized gifts for the holidays, and also how to rivet and how to etch with the E3 Etch system. It's like getting classes from Sherri for free! Here is the link to Jewel School:

http://www.jtv.com/Jewel-School/Jewel_school_weekly,default,pg.html#top

Scroll down to the icons with the episodes on the site and you'll find Sherri's classes.


Wednesday, October 19, 2011

Bead Unique Review: Sherri Haab Inspirations


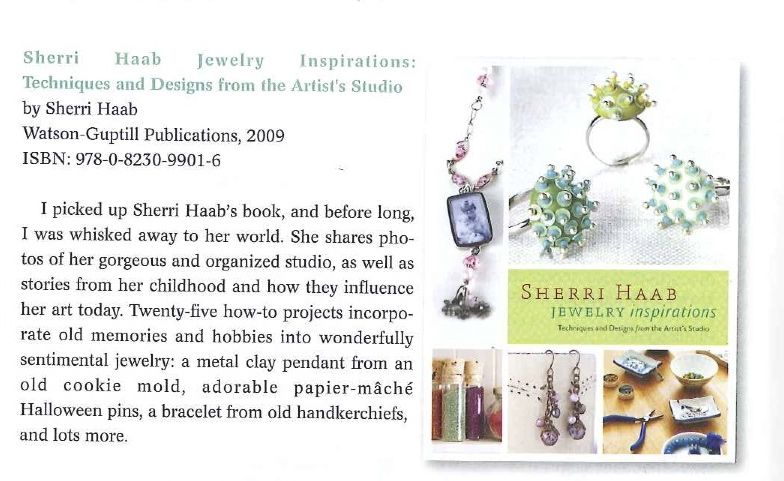
If you are a fan of Bead Unique magazine like we are, you may have seen this review of Sherri's book, Sherri Haab Jewelry Inspirations. Besides the wonderful review, this issue is filled with lots of great ideas for inspiration.

If you're not familiar with Jewelry Inspirations, you should definitely check it out. See Sherri at home in her studio and the people and things behind her ideas. Truly an inspiration!

Monday, September 12, 2011

Electroforming Tips - Keep it Moving, Keep it Warm

On a recent visit to the studio of jewelry artist Nancy Worden, she was gracious enough to educate me on some of her valuable tips for electroforming. Nothing can replace the years of experience she gained through her labors, and with plating there are no easy shortcuts. I am anxious to pass along a few vital steps I learned from her:

KEEP IT MOVING: Agitation reduces the sharp and uneven build-up of copper particles on your piece. This is especially true for pieces that are left to be electroformed for long periods of time. If you have ever left a certain piece to build a heavy layer of copper for a long time, you may have noticed that the edges or protrusions feel sharp or rough. By providing a way to circulate the free floating copper particles, the result will be more rounded edges which do not feel as sharp. It may be of interest to note that Polypropylene anode bags also play a role in keeping the particles from forming sharply.
A simple solution? An Aquarium air pump. To make your own bubbling device, drill holes in a piece of tubing to be fitted to the pump. In this photo you can see how a slightly larger tube was drilled and fitted over the longer green tube which fits snuggly to the pump. The end with holes in it is placed in the electroforming solution about 30 minutes to an hour after the initial coat of copper is formed. Turn the pump on to provide agitation for the remaining time necessary for electroforming.

KEEP IT WARM: Optimal temperature for electroforming copper is between 75 and 80 degrees fahrenheit. Nancy Worden has found through years of experimentation that this produces the best results. You can use warming devices such as an electric heating pad to heat the tank, especially in winter. Use safety precautions when using electric devices near water.

MAINTAINING THE ELECTROFORMING SOLUTION: There is no easy answer for this one. This can get very complicated, and frankly dangerous, if you start adding acids or experimenting without some knowledge and respect for electrochemistry. Artists like Nancy have their own protocol for maintaining and attending to the plating bath. As every situation is unique, you have to take responsibility for deeper education and study. There are pdf's and books online that are written for associated products from the plating industry for detailed information. You have to decide at some point whether the goal for using the solutions is for a personal hobby, mass production, or an industrial studio set-up. The latter involves getting to know the chemicals and developing a personal knowledge for how and what to do to keep the plating solutions clean and filtered, and the ph levels even. Most solutions sold for small studio or hobby use are sold with the premise that they will be used until exhausted (at a certain coverage rate) and then replenished as needed.

SOME METALS DON'T PLATE: With any art or science like electroforming, there are always new things to learn. One thing I learned recently is that there are certain metals which will not successfully plate with copper without pre-treatment. Steel, iron, or metal with tin in it will not plate well.

 - Sherri

Friday, August 5, 2011

ITS on Tile part 2


Yesterday's blog introduced using ITS on tile. Above are image from my stepson Chris' and Hailee's wedding. I decide to do these in color because the orange and turquoise color scheme really pops. You can see the imperfections in the images, but that's part of their charm.


Image transfer, especially on tile, is not an exact science. It’s best to make a few extra copies of your images in case they don’t turn out the first time. Your images will not be perfect, but will have variation because of the natural contours of the tile, the saturation of the photo and other variables. That’s the beauty of this kind of image transfer, though. Each tile is unique and a has a special character. If you do need to re-do a tile, just soak it in water (before you put on the sealer) and then use coarse sandpaper to sand off the image.


Depending on your image, you may want to tear the edges so it doesn't have a hard edge. Above is the difference between a straight edge and a torn edge. If your photos are black and white, the light parts of the photo will naturally disappear, creating a soft edge even when the image is cut straight, such as in the image below.


Bubbling
The tile below has a lot of white spots because the paper bubbled. Sometimes, like in this tile, they turn out looking great. In general, though, you want to avoid bubbling because if you get a white spot on someone's face, or an important part of the picture, it's a do-over.

White Film
The white film on the lower part of the image means that all the paper has not been removed yet. It needs to be polished some more with the blue 3M polishing sheet under running water.


Picture Placement
Since tile has natural dips and bumps, sometimes it will interfere with the picture. The bride's face on this tile gets lost in the natural contours. It would be best to start over and turn the picture a quarter turn.


Remember that your own images might require some experimentation. Luckily, if you don't like the first result, it's easy to sand it off and start over. I've had so much fun with this new technique, I've got more coasters than I know what to do with!

New Project! ITS on Tile


Sherri's been working for a while to perfect a method to successfully transfer images onto tile. We finally got great, consistent results after some trial and error. Above you can see black and white images from Sherri's daughter Rachel's wedding, and color images from my daughter Brennyn's wedding. I love this project because they are great handmade gifts that anyone can appreciate. The images don't turn out perfectly, and they have a quality that makes them almost looked painted on. You can turn them into coasters (my favorite use) or put them on small easels for tabletop display.


You will need:
4 x 4” tumbled marble tile
ITS Solution
ITS Paper
Images
Scissors
Paintbrush
3M Wet/Dry 1200-grit blue abrasive sheet
ITS Matte or Gloss Sealer
Felt chair pads or 4 x 4 square of felt


1. Soak the tile in water and scrub it clean to get all the dust off. Let dry.
2. Paint a layer of ITS solution over the tile. Let dry.


3. Size your image so it is slightly smaller than the tile. Remember that the image will appear as a mirror image on the tile. Copy the image onto ITS paper using a commercial copy machine or print it on a laser printer. Use the color setting even if your image is black and white. Cut out the image. If the background of your image is dark, you may want to tear the edges for a softer look.


4. Paint an even layer of ITS solution on the tile. (The layer of ITS should be thin enough to still be transparent, but thick enough so there are no bare spots.) Place the image face down on the tile, being careful to center the image.


5. Press the image on the tile, working from the middle out toward the edges. Smooth the image firmly, pressing out any air bubbles. Turn the tile over on a flat, sturdy surface and press on the back of the tile to help the image make full contact with the tile. If there are still air bubbles, you can use a barely damp sponge to help smooth them out, or prick with a pin or point of a blade and press them flat.


6. Heat set the tile by placing the tile in a pre-heated 325 degreee oven for 30 minutes. After removing from the oven, it is important to let the piece cool thoroughly before the next step.
7. Soak the tile in water for a few minutes. Use your fingers to remove the paper, carefully rolling off layers of paper, working from the center out.


8. When you’ve removed most of the paper, use a 3M Wet/Dry 1200-grit blue abrasive sheet under running water to remove the remaining fiber. The fiber is removed when there is no longer a white film covering the image.


9. Paint a layer of ITS Matte or Gloss Sealer over the image. Wait 30 minutes, then bake at 375 degrees for 30 minutes to heat set. Let cool.
10. To make a coaster, stick felt chair pads on the back of the tile, or glue on a square of felt so the tile won’t scratch furniture.

Next blog: Troubleshooting

Monday, August 1, 2011

Tune in to Jewel School


What's better than taking classes from Sherri Haab? When they're free! Sherri will be appearing on Jewelry TV's Jewel School on Thursday, August 11 from 11 a.m. to 2 p.m. While promoting some exclusive kits on the show, she will demonstrate both metal etching and ITS image transfer. These are examples of the projects she will be teaching you to make.

You will also want to check out the kits that will be sold on the program at a great price. The metal etching kit contains everything you need to etch, along with a bonus of all of the jewelry findings for several pieces of jewelry and a selection of transferable images designed for the copper shapes in the kit.

The ITS kit contains all the materials and findings you need to make a charm bracelet and matching necklace, a full sheet of images ready to transfer and five blank sheets of ITS paper to use for your own personal images.

Don't miss out on this opportunity to see Sherri in action and learn some exciting new skills. BUT WAIT! Of course they will be offering some special deals during the course of the show, so tune in!

Saturday, June 25, 2011

Rings & Things Blogs on ITS


Cindy at the Rings & Things blog made this amazing Alice in Wonderland bracelet and teahouse pendant using Sherri's ITS image transfer solution. Besides the great example of an ITS project, her blog has a great how-to (with photos!) on a different method for using ITS solution.


She uses an iron to heat-set the image and has some other tips that will help you have great results with your image transfer projects.

Cindy also shows how she uses ITS to seal inks onto metal, like on this peacock pendant and bee hairpin. She uses alcohol inks on metal, then sets the ink with ITS to make it permanent.

You can also mix ITS with the alcohol ink to create a permanent "paint" that won't wash or rub off. Either method requires heat-setting, which you can do in the oven, following the directions on the ITS package.